Welcome to the
! Please enjoy our special offers for you

Water leaks in a Samsung refrigerator

Many times when you see a pool of water (or one that froze into a sheet of ice), it can often be attributed to condensation or a spill you didn't notice. The most common place to see water is at the bottom of the compartment, such as below the vegetable or crisper drawers. Leaks can occur outside of the refrigerator, or you can have an auto fill water pitcher that is leaking as well. Depending on where the leak is coming from, we will show you what steps to take to find the cause and hopefully keep it from happening again.
Bottom doors of a Samsung Refrigerator with water leaking onto the floor

Water leaks in a Samsung refrigerator

Where is the leak coming from?

Leaks from the Autofill water pitcher
Leaks from the refrigerator's water filter
Leaks under the drawers, under the fridge, or other areas
Water is dripping or leaking from the dispenser
Leaks from the Autofill water pitcher
1
Prepare to drain the Autofill compartment.
Remove the pitcher, and dry it off with a towel. You'll also need a towel or container to collect any water that drains out of the system on the next step.
Note

Older models don't have a rubber drain cap

If your model doesn't have a rubber drain cap, then skip to step 3.

2
Remove the rubber drain cap under the Autofill compartment, and drain all the water.

Even if you don't see any water in the compartment, if there's any water in the drainage area, it will need to be drained dry in order for the Autofill function to resume.


Rubber cap location under the Autofill compartment

Caution

It's not dishwasher safe

Your Auto Fill Pitcher is not dishwasher safe. Washing it in the dishwasher can warp the pitcher and cause leakage. Always hand wash the pitcher with mild soap and water.

3
Inspect the pitcher and lid for cracks or other damage.

If any of the pieces are damaged, they will need to be replaced. Visit samsungparts.com for replacements.

Autofill pitcher cracked illustration

4
Dry all the pieces and reassemble them.

Make sure the pitcher's lid is assembled correctly. If the pitcher and its lid are not aligned correctly, water may leak. Also, the Autofill function will not fill the pitcher if moisture is detected, so make sure everything is dry. The pour spout should face away from the handle, and the two-part lid should be assembled so the pieces match up and fit securely together.

Illustration of water pitcher being assembled

5
Make sure the button behind the pitcher is not stuck.

There is a spring-loaded button behind where the pitcher goes. Press on the button and make sure it is not sticking. This button must have full contact with the pitcher when it is installed for the Auto Fill feature to function.

Button highlighted behind the pitcher compartment

6
If the leak is an issue with the pitcher, replace the pitcher.
If the pitcher continues to leak, especially if it leaks even when it is not in the fridge, then replace the pitcher. For a warranty replacement, contact us. For out of warranty purchases, visit samsungparts.com.
7
Request service.
If the leak continues, and is not an issue with the pitcher, then visit our Support Center to request service.
Leaks from the refrigerator's water filter
1
Remove the filter and inspect it.

Remove the water filter and check both it and the water filter housing for damage.

  • If the water filter looks damaged or is not a genuine Samsung filter, replace the water filter. Samsung genuine water filters are available on our website.
  • If the water filter housing is damaged, or the leak continues with the filter removed, visit our Support Center to request service.

Here are some ways to determine if a filter is genuine:

2
Clean up the water and reinsert the filter.
If the leak occurs again, replace the water filter with a Samsung brand filter.
3
Request service.
If the leak still continues with a new filter, visit our Support Center to request service.
Leaks under the drawers, under the fridge, or other areas
1
Level the refrigerator.

A correctly "leveled" refrigerator is not level from front to back. Refrigerators are designed to tilt back slightly, which helps the doors to close by themselves, and helps with draining.

A quick way to check your level is to look under the front. If the wheels for moving the refrigerator are still touching the floor, the front is not high enough. See our guide on how to level the refrigerator to raise the front higher.

2
Clear the water away.

The purpose of this is to confirm that it's actually a leak. Possible other causes could be:

  • Condensation (such as if the fridge was recently turned off or without power)
  • A spill or a leak from one of the food items in the refrigerator
3
Request service.
If the leak returns, visit our Support Center to request service.
Water is dripping or leaking from the dispenser
Important

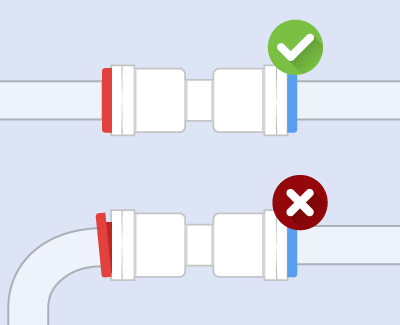
If your dispenser is dispensing by itself sometimes (RS27T and RS22T models)

The RS27T and RS22T models have two water lines to connect. If they are cross-connected, the water and ice dispensing functions will be swapped, so the ice maker will leak when you try to dispense water, and the dispenser will dispense water when the ice maker tries to make ice. If you have this issue, it can be resolved by correcting the water lines.

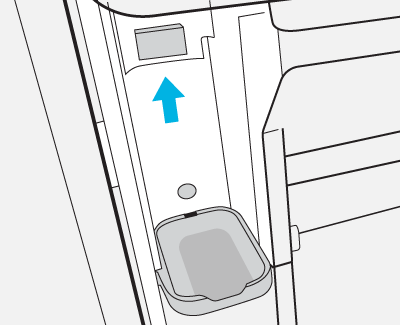
If your nozzle is missing (RF30BB, RF29BB, RF24BB, and RF23BB models)

On these models, the dispenser should have a nozzle that sticks down from the ceiling of the beverage center. If the nozzle is missing, contact us for a replacement.

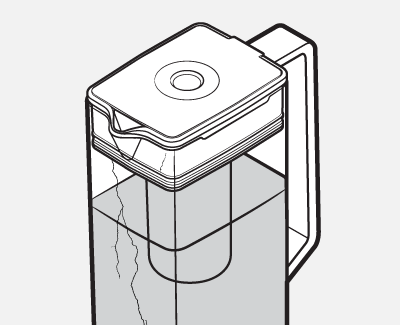
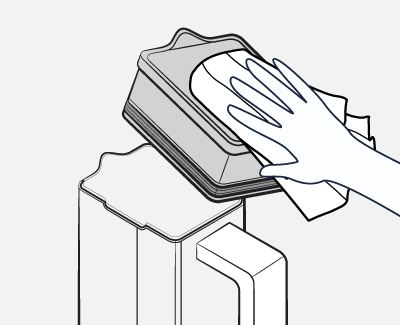
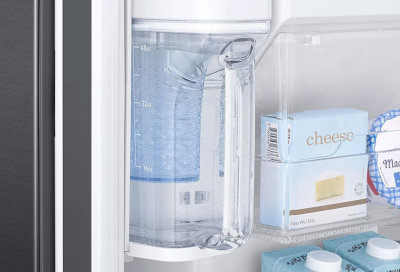
If your model has both an Autofill pitcher and a dispenser

These models have an extra valve that prevents leaks from the dispenser. If the pitcher is leaking, return to the top of this article and select "Leaks from the Autofill Pitcher." If the dispenser is leaking on a model with an Autofill pitcher, visit our Support Center to request service.

If it's only a couple drips after dispensing

It's normal for the dispenser to drip for a few seconds immediately after dispensing water. Once the dispensing stops, leave the glass under the dispenser approximately 3-5 seconds to catch the drips.

If the dispenser only drips water when you dispense ice

See our guide specific for that issue.

The most common reasons for water dripping from the dispenser are:

  • Air is trapped in the water line when a water filter is replaced or the fridge is recently installed.
  • The refrigerator has some ice buildup or ice residue in the ice chute.
  • The ice chute does not form an airtight seal with the refrigerator.

1
Clean the ice chute and the seal.
Make sure that all residual ice is cleared out of the ice chute and that the chute is completely dry.
2
Confirm the ice chute and ice bucket seal properly.
Open the right side door and look inside the fridge at the ice maker and ice chute. These parts are attached to the left door. The gasket should sit flush up against the ice bucket. If there is a gap, warm air from the refrigerator will enter the ice maker compartment and melt the ice. This causes water to drip from the dispenser. To resolve this issue, see our guide on leveling the refrigerator.
Note

Were the doors removed recently?

The water lines and couplers only need inspection if the issue has been happening since the last time the doors were removed, such as during installation or if the fridge was relocated. If this is not the case, skip to step 4.

3
Inspect the water lines and couplers.

If the water line under the hinge cover is not connected properly when the doors are put back on, air can get into the water coupler. Make sure it is not bent at the coupler because this will allow air in and cause a drip.

To reach the water coupler, review the steps for removing and reinstalling the doors in your user manual.

Water Line Coupler

4
Purge the air from the water line.

If the water filter was recently replaced or your refrigerator was recently installed, dispensing water will help remove any trapped air and stop the water dispenser from leaking.

Dispense water into a large pitcher until it automatically stops.

  • If the water stream sputters while dispensing, empty the container when it stops and dispense again three more times if it sputters each time.
  • If the stream is steady and the dripping stops, it is safe to assume that there is no air in the water line.
  • If the dripping continues, you need to check the water line and couplers.
Important

Do you have a well system?

If you have a well system, an air eliminator should be installed. If the dispenser is starting to drip, the air eliminator may not be working correctly. Contact a plumber for assistance with your air eliminator.

5
Check the water pressure.

If your water pressure is too high or too low, the water valve may not close correctly, triggering a leak.

Your water line should have enough pressure to fill 6 ounces (or 3/4 cup) in less than 10 seconds. Dispense water into a measuring cup to confirm the amount.

  • If no water dispenses at all, verify that the water line is connected. See more troubleshooting in our guide.
  • If the cup was filled in less than 10 seconds, then you have sufficient water pressure and the test was successful.
  • If the test failed, remove the water filter and try again.

Second test (if needed):

  • If the second test passes it is either low water pressure or an old filter that requires replacement. Replace the filter and then start the test again. (Use only Samsung brand filters.)
  • If you’re already using a new filter and the test is successful only when the filter is removed, then the water pressure is too low.
  • If both the first and second tests fail, your water pressure is too low.

If your water pressure is too low, make sure the home's water supply valve is fully open. If it wasn't already fully open, then this may have resolved your water pressure issue, so do the test all over again and see.

Note

Is your water pressure too high instead?

If instead your suspect your water pressure of being too high, contact a plumber for assistance in reducing the water pressure. It should be between 30 and 130 psi.

Are you using Reverse Osmosis?

If you're using a Reverse Osmosis system to filter water, this may cause the water pressure to be too low. In this case, contact a plumber for assistance in increasing water pressure.

6
Request service.
If the stream continues to sputter, or the dispenser still drips when not in use, visit our Support Center to request service.
Was this content helpful?
We're here for you

Contact Samsung Support

Contact us online through chat and get support from an expert on your computer, mobile device or tablet. Support is also available on your mobile device through the Samsung Members App.
auto-contact_us-pc-2x auto-contact_us-pc-2x
Fast, easy checkout with Shop Samsung App
Easy sign-in, Samsung Pay, notifications, and more!
Or continue shopping on Samsung.com
×
The Shop Samsung app
Free standard shipping, exclusive offers and financing options.
GET
×
The Shop Samsung app
Free standard shipping, exclusive offers and financing options.
GET
×

You Are About To Be Redirected To Investor Relations Information for U.S.

Thank you for visiting Samsung U.S. Investor Relations. You will be redirected via a new browser window to the Samsung Global website for U.S. investor relations information.
CANCEL
CONTINUE
×

Redirect Notification

As of Nov. 1, 2017, the Samsung Electronics Co., Ltd. printer business and its related affiliates were transferred to HP Inc.

For more information, please visit HP's website: http://www.hp.com/go/samsung


Select CONTINUE to visit HP's website.

CANCEL
CONTINUE